Inspired by an excellent blog post by Delba de Oliveira on how to set up automated og:images in next.js using Cloudinary.
What is an Open Graph image (og:image)?
An Open Graph image is a preview image that social networks use whenever a link to an external website is shared. They are certainly very cool, and as Github has demonstrated you can use them to convey a lot of information.
What we’re building today is an automated method for building this image for all my blog posts:
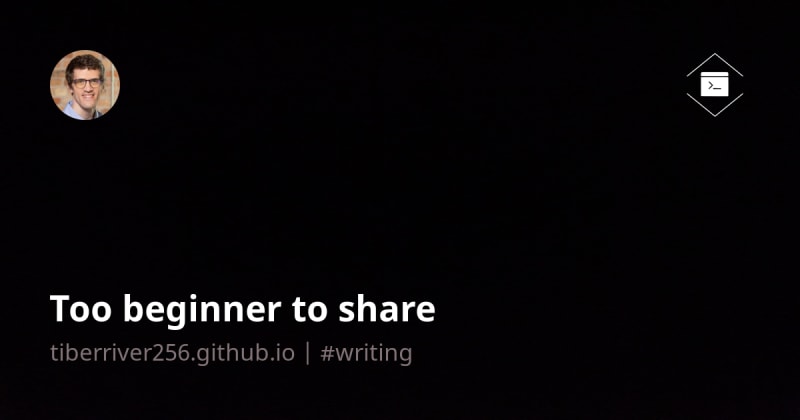
What I want included in my image
- My photograph (auto-synced from gravatar)
- My blog logo
- My blog theme (font/colors)
- Title for my blog post
- Tags for my blog post
How it’s built
URL Breakdown
Here’s a full URL for you:
https://res.cloudinary.com/dhff6zdnc/image/fetch/w_1200,h_630,q_100/l_fetch:aHR0cHM6Ly90aWJlcnJpdmVyMjU2LmdpdGh1Yi5pby9pbWFnZXMvbG9nb19saWdodC5zdmc=/co_rgb:fff,e_colorize:100/fl_layer_apply,w_105,g_north_east,x_75,y_75/l_text:noto%20sans_54_bold:Too%20beginner%20to%20share,c_fit,w_1050,co_rgb:FFF,h_180/fl_layer_apply,g_south_west,x_75,y_135/l_text:noto%20sans_36:tiberriver256.github.io%20%7C%20%2523writing,co_rgb:ffe4e680,c_fit,w_1050,h_135/fl_layer_apply,g_north_west,x_75,y_512/l_gravatar:f2cc976ebe94f2bdaa2ff21801312836/c_thumb,g_face,r_max,q_100/fl_layer_apply,w_105,g_north_west,x_75,y_75/https://tiberriver256.github.io/images/Black.jpg
Let’s break this giant url down into segments for inspection and then I can share the liquid template
Segment
https://res.cloudinary.com/<cloudinary-id>
Description
The base url to your Cloudinary cloud
Segment
/image/fetch
Description
The base action for this url. fetch means that Cloudinary
is going to get the image from whatever url I place at the very end of this
giant URL. This is nice because I don’t have to upload anything to Cloudinary.
Segment
/w_1200,h_630,q_100
Description
The image that is fetched is going to be resized to 1200x600
maintaining 100% quality.
Segment
/l_fetch:aHR0cHM6Ly90aWJlcnJpdmVyMjU2LmdpdGh1Yi5pby9pbWFnZXMvbG9nb19saWdodC5zdmc=/co_rgb:fff,e_colorize:100/fl_layer_apply,w_105,g_north_east,x_75,y_75
Description
l_fetch
grabs another image (my logo) from a base64 encoded url. My logo is an svg, so
Cloudinary can colorize it white for me using co_rgb and e_colorize. I then
place the logo anchored to the top-right g_north_east and set it to a width of
105 pixels using w_105.
Segment
/l_text:noto%20sans_54_bold:[BlogTitle],c_fit,w_1050,co_rgb:FFF,h_180/fl_layer_apply,g_south_west,x_75,y_135
Description
Here’s where we actually get to insert my blog title into
the url using
l_text.
Cloudinary lets you use a wide variety of fonts. I chose Noto Sans as it was
similar to the font I have on my blog. I set the font-size to 54. I set the
font-weight to bold. I ensured the text would wrap by using c_fit and a
width w_1050. I ensured it wouldn’t go more than two lines by setting a height
h_180. I colored it white using co_rgb:FFF. I anchored it to the bottom left
using g_south_west. I placed it’s anchored location using the x and y
coordinates x_75,y_135.
Note: This places the bottom of the text. As text wraps it will grow upwards since we are anchored to the bottom of the photo.
Segment
/l_text:noto%20sans_36:[website]%20%7C%20[tags],co_rgb:ffe4e680,c_fit,w_1050,h_135/fl_layer_apply,g_north_west,x_75,y_512
Description
Here I placed my tags using another
l_text
layer. I set the font to noto sans. I set the font-size to 36. I put in my
website url and tags as url encoded text. I colored it a light-gray using
co_rgb:ffe4e680. I ensured it would wrap using c_fit and setting a max width
of w_1050. I anchored it to the top-left using g_north_west I placed it just
below my title using the x and y coordinates x_75,y_512.
Note: I want the text to wrap downwards here and upwards in the title. This is achieved using opposing anchors. The title is anchored to the bottom, and the subtitle/tags is anchored to the top. This way they grow away from each other.
Segment
/l_gravatar:f2cc976ebe94f2bdaa2ff21801312836/c_thumb,g_face,r_max,q_100/fl_layer_apply,w_105,g_north_west,x_75,y_75
Description
Here I placed an image of myself synced from gravatar using
l_gravatar.
f2cc976ebe94f2bdaa2ff21801312836 is just an MD5 hash of my email address. I
transformed it into a rounded thumbnail ensuring my face was kept in focus using
c_thumb,g_face,r_max,q_100. I made it 105 pixels wide using w_105. I
anchored it to the top-left using g_north_west. I placed it using the x and y
coordinates x_75,y_75.
Segment
/https://tiberriver256.github.io/images/Black.jpg
Description
We finally reached the end of the URL 🎉🎉!! This part ties
in with the first /image/fetch segment and tells Cloudinary which image all
these transformations should be layered on top of.
Liquid Template
Now that we have a nice URL, let’s pull out the variables that we actually might want to change from post to post:
- Cloudinary CloudId - Put it into the
_config.yml - Website URL - I could do
site.urlbut I really want to strip thehttps://stuff so let’s just keep it in the_config.yml - Post title - Jekyll variable
page.title, if it’s not available (i.e., homepage) we can fallback to usingsite.title - Tags - Jekyll variable
page.tags. - Gravatar Id - It’d be smart to just extract this out into
_config.yml - Logo base64 url - Let’s also pull this out into
_config.yml - The background image URL - Put it into the
_config.yml
Let’s set up my _config.yml with the following variables we’ll need:
bareUrl: "tiberriver256.github.io"
ogImageBackground: "/images/Black.jpg"
cloudinary_cloud: dhff6zdnc
base64_encoded_logo_url: aHR0cHM6Ly90aWJlcnJpdmVyMjU2LmdpdGh1Yi5pby9pbWFnZXMvbG9nb19saWdodC5zdmc=
gravatarmd5: f2cc976ebe94f2bdaa2ff21801312836
Now with all that as a backdrop it was pretty simple to put together a little liquid snippet to place in the head.html of my blog.
{% comment %}
    Cloudinary cloud
{% endcomment %}
{% assign ogImageUrl = 'https://res.cloudinary.com/' | append: site.cloudinary_cloud %}

{% comment %}
    Fetch an image and set its width to look good on social media
{% endcomment %}
{% assign ogImageUrl = ogImageUrl | append: '/image/fetch/w_1200,h_630,q_100' %}

{% comment %}
    Fetch the logo to put in the top right
{% endcomment %}
{% assign ogImageUrl = ogImageUrl | append: '/l_fetch:' | append: site.base64_encoded_logo_url %}

{% comment %}
    Ensure the logo is colored white and apply it
{% endcomment %}
{% assign ogImageUrl = ogImageUrl | append: '/co_rgb:fff,e_colorize:100' %}

{% comment %}
    Place the logo in the top-right corner
{% endcomment %}
{% assign ogImageUrl = ogImageUrl | append: '/fl_layer_apply,w_105,g_north_east,x_75,y_75' %}

{% comment %}
    Build the title of the post
{% endcomment %}

{% if page.title %}
    {% assign title = page.title %}
{% else %}
    {% assign title = site.title %}
{% endif %}

{% assign ogImageUrl = ogImageUrl | append: '/l_text:noto sans_54_bold:' | append: title %}

{% comment %}
    Ensure the text wraps and is colored white
{% endcomment %}
{% assign ogImageUrl = ogImageUrl | append: ',c_fit,w_1050,co_rgb:FFF,h_180' %}

{% comment %}
    Place the title
{% endcomment %}
{% assign ogImageUrl = ogImageUrl | append: '/fl_layer_apply,g_south_west,x_75,y_135' %}

{% comment %}
    Build the subtext
{% endcomment %}
{% assign subtext = site.bareUrl %}

{% if page.tags %}
    {% assign subtext = subtext | append: ' | ' %}
    {% assign tagsString = '' %}
    {% for tag in page.tags limit: 3 %}
        {% assign tagHashTag = tag | slugify | prepend: '%2523' %}
        {% assign tagsString = tagsString | append: tagHashTag %}
        {% if forloop.last == false %}
            {% assign tagsString = tagsString | append: ' · ' %}
        {% endif %}
    {% endfor %}
    {% assign subtext = subtext | append: tagsString %}
{% endif %}

{% assign ogImageUrl = ogImageUrl | append: '/l_text:noto sans_36:' | append: subtext %}

{% comment %}
    Color and wrap the subtext
{% endcomment %}
{% assign ogImageUrl = ogImageUrl | append: ',co_rgb:ffe4e680,c_fit,w_1050,h_135' %}

{% comment %}
    Place the subtext
{% endcomment %}
{% assign ogImageUrl = ogImageUrl | append: '/fl_layer_apply,g_north_west,x_75,y_512' %}

{% comment %}
    Build the gravatar image
{% endcomment %}
{% assign ogImageUrl = ogImageUrl | append: '/l_gravatar:' | append: site.owner.gravatarmd5 %}

{% comment %}
    Crop the gravatar image
{% endcomment %}
{% assign ogImageUrl = ogImageUrl | append: '/c_thumb,g_face,r_max,q_100' %}

{% comment %}
    Place and size the gravatar image
{% endcomment %}
{% assign ogImageUrl = ogImageUrl | append: '/fl_layer_apply,w_105,g_north_west,x_75,y_75' %}

{% comment %}
    Add the background image
{% endcomment %}
{% assign ogImageUrl = ogImageUrl | append: '/' | append: site.url | append: site.ogImageBackground %}

<meta property="og:image" content="{{ ogImageUrl | uri_escape }}">